
 Amazon Virtual Private Cloud (Amazon VPC)
Using a VPC, we can create an AWS resource into a virtual network and a VPC can be created across more than one availability zones to get a high availability of the resources.
So, let’s start the task of creating a VPC in two subnets and one availability zone.
Step 1: As all the services are listed in the Management Console, go to AWS Management Console, on the Services Click VPC to start the creation procedure.

Step 2: Start VPC Wizard will initiate the VPC installation steps.
Step 3: We are going to create a VPC that can be configured with private subnets and public subnets. Navigate on the left panel to select the VPC with Public and Private Subnets

Step 4: Further proceeding to next page, different setting shown need to be configured as follows.
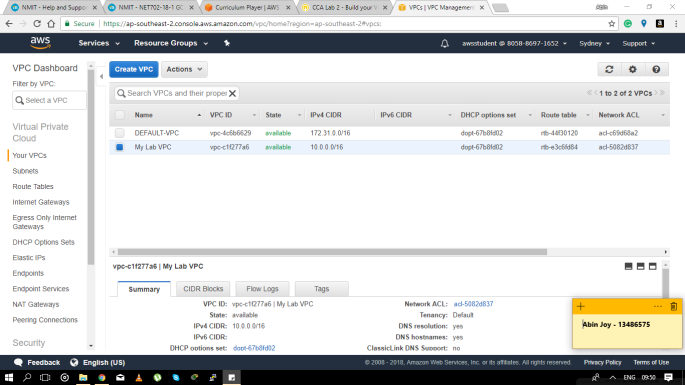
- IPv4 CIDR block: 10.0.0.0/16
- VPC Name: My Lab VPC
- Public subnet’s IPv4 CIDR: 10.0.1.0/24
A warning will be displayed saying like the public and private subnet overlap, you can ignore this warning as we are fixing this issue later.
Now we need to select the Availability Zone that we need to set, availability zone describes the region where we need to choose for the server to place.
We need to choose the availability zones for the private and public subnets.
- Availability Zone: Choose the first availability zone displayed
- Public Subnet Name: Public Subnet 1
- Private subnet’s IPv4 CIDR: 10.0.3.0/24
Repeat the same for the private subnet configuration
- Availability Zone: Choose the same availability zone as the previous.
- Private Subnet Name: Private Subnet 1

Step 5: After this, you need to specify a NAT gateway to be used for this VPC. A NAT gateway is used to enable the interactions between a private network and public network.
Instead of specifying a NAT gateway, here we are choosing a NAT instance instead. Click on the Use a NAT instance instead on the far right of the screen.
- Choose a key pair as well. and click on Create VPC to complete the creation process.
Step 6: After the VPC creation, we are going to create two additional Subnets in another Availability zones and attach them with the existing route tables.
- Go to the subnet creation page by Clicking on Subnets from the navigation panel
- Click Create Subnet
Step 7: On the create subnet page, the configurations are needed to be set accordingly as follows.
- Name tag: Private subnet 2
- VPC: My Lab VPC
- Availability Zone: Here we need to choose a different availability zone from the one we chose for the subnet 1. so choose second availability zone.
- CIDR Block: 10.0.4.0/24

And the subnets will be added once we click on Yes, Create
Step 8: Now, we are moving forward in adding route tables, as we have added the subnet we need to define the path it should route the traffic.
- To go to the route tables, go through the navigational panel on the left side and select Route Tables.
- Choose the Route table of My Lab VPC (Yes under main) and name the route table as Private Route table
In the lower panel, the routes will be shown and verify the destination 0.0.0.0/0 is set to Target eni-xxxxxxxx/i-xxxxxxxx. This route table entry is responsible for the traffic between private subnets to the NAT instance.

Step 9: After entering the route tables, we need to select the subnets associated with this routing. For that, click on the Subnet Associations and edit
- Select both the Private subnet 1 and Private subnet 2 and Click Save
Now the routing and subnet association of Private network has been completed
Step 10: Now we will repeat the same process for the Public Network.
- Choose the route table My Lab VPC (No under Main) and name it as Public Route Table
- The lower panel will show the Routes and verify the destination 0.0.0.0/0 is set to Target igw-xxxxxxxx.
Thus the configuration of Public route table is done and we are now associating the related subnets.
Under Subnet Association Select the public subnet 1 and Public Subnet 2 and save.

Step 11: Go to the Security Groups page, from the left navigation panel
- Proceed by Clicking Security Groups
Now, the configuration page will be displayed and configure the settings as shown below
- Name tag: WebSecurityGroup
- Group Name: WebSecurityGroup
- Description: Enable HTTP access
- VPC:My Lab VPC (This is the VPC that we created already and we are going to attach this security group to that VPC)

Select Yes, Create to create the security group and now we need to add some rules to this Security group so that the incoming and outgoing traffic should work fine.
Step 12: Select WebSecurityGroup and go to Inbound Rules tab and edit.
- Type: HTTP (80)
- Source: 0.0.0.0/0

Save this configuration, and now the Inbound rule allowing HTTP connection from any IPs.
To run a web server into the VPC, we can launch an EC2 instance into a VPC and convert that instance to represent a web server by installing necessary services in it.
For the detailed explanation of the creation of EC2, please go to the below URL
https://technetworkz.wordpress.com/2018/03/28/amazon-ec2/
Step 13: First we create the EC2 instance with a Linux AMI.
- Take the EC2 page from the Services menu at the top.
- After clicking Launch Instance, you will get a page to select the AMI where we choose the Amazon Linux AMI.
- Choose the instance type as t2.micro and go to Configure Instance details
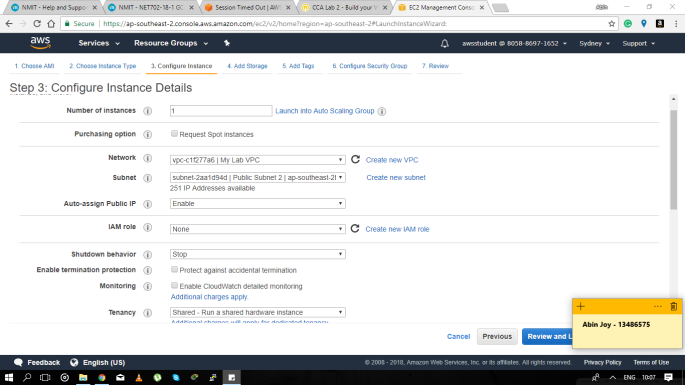
Step 14: Enter the below configuration for the instance
- Network: Select My Lab VPC
- Subnet: Public Subnet 2 (10.0.2.0/24)
- Auto Assign Public IP: Enable
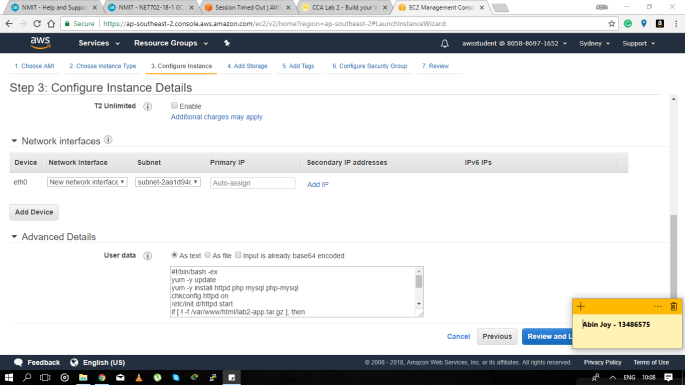
after configuring the instance we need to use the User data Feature install the necessary services like, httpd, PHP, MySQL and PHP-MySQL.
Step 15: For that go to Advanced Details Section and copy the below code into User data field
#!/bin/bash -ex
yum -y update yum -y install httpd php mysql php-mysql
chkconfig httpd on
/etc/init.d/httpd start
if [ ! -f /var/www/html/lab2-app.tar.gz ]; then
cd /var/www/html
tar xvfz lab2-app.tar.gz
chown apache:root /var/www/html/rds.conf.php
fi
These script will install the services and configure them accordingly. Now we need to complete the remaining steps of creating the instance.
Step 16: We don’t need to change any other details further and we can keep it as default
Click Next: Add Storage and Click Next: Add Tags. Configure the settings with the below entries
- Key: Name
- Value: Web Server 1
Step 17: Thus the Tags are added, and now we need to set up a Security Group
- Next: Configure Security Group
- Select an existing security group (WebSecurityGroup)
Complete the creation by Review and Launch and click Continue
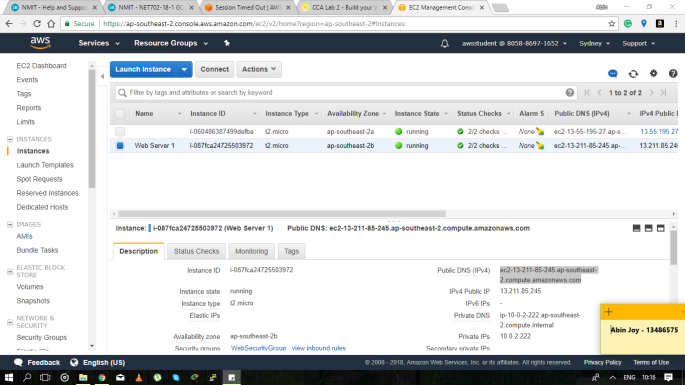
Launch Instance and you will see two instances, Web server 1 and NAT instance.
Step 18: Select Web Server 1 and copy the Public DNS value
Browse the DNS in a web browser and you will see a web page displaying AWS logo and instance values.

And its done !!

One thought on “Create a VPC, Subnets, Security Groups & Launch Web Server”